

Make a sweet chocolate llama yourself is no problem with the high quality polycarbonate mold. With different colors and make-up ideas, your very own individual llama is created.
Data sheet
At Easter, people eat a chocolate bunny, and during Advent, chocolate Sami lambs are on the shelves. But who can claim to own a chocolate lama, and a homemade one at that?
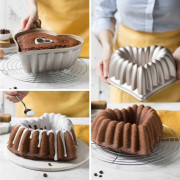
For all molds used to pour chocolate molds, preparation is extremely important. Rinse the mold with lukewarm water and a gentle rinsing agent. This must not contain running water or rinse aid, as this would attack the molds. Then rinse off all residues with lukewarm water and dry the mold very well. From now on, do not touch the mold, otherwise fingerprints will be visible on the chocolate later. Polish the mold with a non-fibrous absorbent cotton or a very fine handkerchief.
Now you can start with the make-up. Take out the tempered couverture and start with the outermost layer. For the eyes, for example, this would be a dark pupil. Once this has dried slightly, apply the next layer, the white of the eyes. This is how you keep working your way inward. For special effects, you can also color your chocolate with fat-soluble powder colors for chocolate or make up the mold with colored cocoa butter. For example, you can create colored flowers or grass at the feet of your figure. While you are making up, you can turn your mold over from time to time. So you can see what your final product will look like approximately.
Once you are satisfied with the colors of your figure, brush the mold with couverture. Be careful not to leave any air holes, otherwise they would be visible when you unmold. Now you can put the two halves of the mold together and fix them with the metal clips provided. Then fill the mold completely with tempered couverture. Tap the side of the mold with a spatula to make air bubbles rise from the mold. Then turn the mold upside down and let the couverture flow out again. Once your desired thickness is reached, clean the bottom edge with a metal horn and place the mold in the refrigerator for 2-5 minutes. Pour a little couverture onto a clean baking paper and spread lightly. Then press the mold with the opening on it. This will become the bottom of the mold. After another 10-15 minutes in the refrigerator, you can carefully break off or cut off the excess bottom. Then follows the unmolding of the figure. Remove the metal clips and separate the mold halves from each other. If the mold does not release immediately, you can help it along with a small spatula. Be careful, the chocolate comes off relatively quickly and should not immediately fall onto the table. You already have your own chocolate lama.
This chocolate mold will create fun and beautiful gifts. Be creative, create different llamas with different colors and patterns to delight your loved ones!
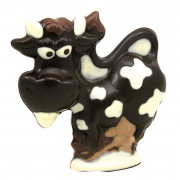

Make a sweet chocolate llama yourself is no problem with the high quality polycarbonate mold. With different colors and make-up ideas, your very own individual llama is created.